
 The other day I had to do one of my bi-yearly trips to IKEA to pick up a lot of stuff I don’t actually need (besides tealights and napkins of course). While there I came across 3-packs of round cork board heat-pads for the kitchen. As soon as I saw them I knew I had to make miniature fabric covered bulletin boards for my daughter’s room. They are turning 11 in a few weeks and I’m planning a surprise bedroom make-over and thought this would be perfect to decorate their walls with something useful.


So as soon as I got home I plugged in my hot glue gun (I’m so scared of that thing) and started cutting out circles in various fabrics. I cut the circles out slightly larger than the heat-pads in order to be able to fold them over the back edge and attach with glue. And yes, it is very dangerous for burning your fingertips. I’m pretty sure I don’t have any fingerprints left.
 In the end I made six boards using different materials. When I have painted the girl’s room I will arrange them all above their desks for them to pin up various photos, letters and keepsakes (please no boyfriend photos for a while though!). For the photos above I attached a few to the art corner cupboard in our living room. I think I’ll be making many more of these in the coming weeks.
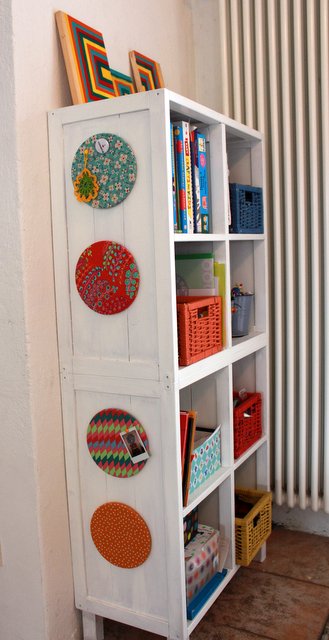 Now I just have to figure out the best way to hang them up. For the cupboard I used 2 sided adhesive pads found in the local fai-da-te (DIY shop). But for attaching them to walls I’ll need something a little sturdier. And advice out there?


oh i love this and actually have a trip to ikea planned so yay! sooooo copying this. love love love it. thanks j-bird.
And I know you have great fabrics to cover them as well! Let me know how they turn out.
Jillian, How about a little fabric loop and hanging them on 3M command hooks? They adhere to the wall and remove easily if you need to change the location. Kate
Love this idea. Cute and helpful. I’m so scared of the glue gun, that I don’t even own one 😉
I’ve owned one for years and it’s the second time I’ve used it. They are seriously scary.
Hi Jillian, your fertile imagination just keeps on inspiring me!
I have a new blog that may interest you – it only launched yesterday and I am still finding my way around a hosted site, but as time goes by it may prove to be a quiet place to go for creative mums…(I have ten children at home, so everything I do happens in super-slow motion, and with many interruptions…)
Consider this invitation my thanks for the enjoyment I gain from your blog.
Kathy.
http://abeautifulhome.net/
Congrats on your new blog (and 10 kids!). Wow. I can’t even imagine how you manage.
Gorgeous idea! I think I’m going to make a couple of them 🙂
I also have to head back to IKEA and pick up some more of the heat pads. I’m imagining a wall full of them!
These are so adorable! I love the round shape. Nice work! xo, MJ
So cute! Ideas are spinning 🙂
I don’t know how I missed this post, I just saw it now, these are adorable!! I’m going to copy you once more!
Oh, our trip is coming up real soon now, I’m really looking forward to seeing you guys!!! xoxo
I love this idea – they are SO cute! I bet you could glue magnets to the backs and put them on the refrigerator or other metal things as well. And if you are afraid of the hot glue gun, what about sewing elastic to the material instead, so you could even switch the cover as your mood changes? Just a few thoughts. I am so thrilled I found your blog – thanks for your amazing ideas!!
Love the idea to put magnets on the back. And I am slowly overcoming my fear of the glue-gun! I made 15 more of these the other day and there were no burns! Thanks for the visit.
Maybe command strips – they can even hang pictures now with these so they certainly could nang these on a wall.
3M Command Large Adhesive Mounting Strips I think would be good.
Great idea! I wanted to let you know that I included your link in my blog if you want to check it out: http://amyroachsenter.blogspot.com/2013/12/crafting-for-uncrafty.html#more
Thanks Amy. Glad you liked it!
genia total, besos desde Argentina
Good article! We will be linking to this particularly great
content on our site. Keep up the good writing.
I checked out IKEA online… 7″ rounds are 1-1/4″ thick, priced at 3 for $3.99 as of June 2015.
One more tip to save your fingers… use wooden popsicle sticks or craft sticks to turn the fabric into the hot glue!