Tag Archives: craft

Surprise Message Bunting Cards

4 Feb

The other day I was chatting with one of my twin daughters about Valentine’s Day and all the fun we’ve had in the past making up special treats and cards for their classmates over the years. Over here in Italy (and I think generally in Europe) Valentine’s Day is a day reserved for couples and adults and not something kids celebrate like in North America.  So even though my kids have always been one of the few that celebrate it in school it has still become a lovely yearly tradition to make something together for their friends.
IMG_4054

This year we decided to make simple cards with sewn paper buntings that have little hidden messages.  Easy, quick and fun for kids of just about any age.IMG_4048-001

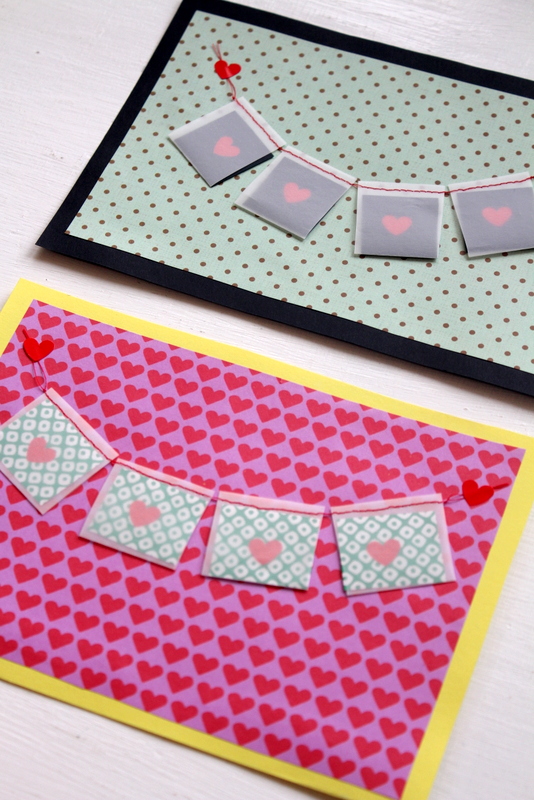
This is all you need to make these sweet little cards.  I used glassine for the actual bunting paper so that you can see the pretty patterned paper through it.  If you don’t have glassine paper any type of paper would be fine.
IMG_4051-002

I cut the glassine paper in long strips and folded it in half to have a square piece of paper.  I then sewed the pieces of glassine squares together with the sewing machine (making sure the folded edge is on the bottom).  This way the glassine paper is sewn on the top, closed by the fold on the bottom and open on the two sides (to make it easier to slip in the small pieces of paper with message on the back).IMG_4068After sewing the bunting together we slipped in little square pieces of paper with our special messages on the back.  Seeing as the glassine is open on both sides the messages are easy to slip in and out.  We then simply attached the sewn paper bunting to our cards with tiny heart stickers (pieces of washi would also be nice).

Now to come up with all the short little messages to go inside.  Some of my favourites that my kids have suggested for their classmates are: ‘you have nice handwriting’, ‘you are pretty smart’, ‘you have the best snacks’ and ‘you don’t smell’.  Let’s hope their romantic sides develop a little more in the years to come.

Advertisement

Handmade Winter

30 Jan

It’s a cold and rainy day here in Northern Italy.  We had a very much anticipated snowstorm last night that had lots of local school kids crossing their fingers in their sleep for a day off school.  Unfortunately the snow turned to rain and the school buses left at their usual time.  There were quite a few disappointed kids heading to school this morning.

After months of mild and sunny days I have to get used to these lower temperatures and the need to wear scarves and winter coats.   In general I’m not a huge fan of the cold but I do love these chilly days where I get to hole up in my house with the fireplace on and putter around keeping myself busy sewing, baking and crafting.  I know the novelty will wear off pretty quickly so indulge me while I wax on about my love for these wintery days.

Today I wanted to tell you all about a great way that you can keep positive, creative, warm and busy through whatever kind of winter you’re experiencing.HANDMADE WINTER SMALL COVER

A few months ago some very talented artists, designers, bloggers, mothers and overall amazing ladies put together an incredible e-book called Handmade Winter with over 50 winter-inspired crafts, activities, recipes, entertaining ideas and more.  They’ve included everything from how to brew the perfect cup of tea to a maxi-skirt sewing tutorial to instructions on how to make yourself a leather and chain chevron necklace.  One of my favourite things about this book is the variation it offers.  There is something for everyone (husbands and kids included).

creative-mamas-winter-ebookThis book will help us all get through these long cold wintery months (especially thanks to the Warm Masala Chai recipe found on page 25/26!).

Handmade Winter costs $15 (US) and is easily purchased and downloaded on-line.

Snail Mail Booklet Letters

6 Sep

IMG_0824

It’s Friday and we all survived the first hectic week back to school.  The kids returned home from their first days at secondary school actually relieved.  Which means Mama was relieved.  They love the new schedules and running back and forth between classes and the fact that they are being treated more and more grown up.  It seems as though they’re ready for all this so I guess I have to be too.  Wish me luck.

As you may know my kids and I are big fans of snail-mailing our friends and family from around the world.  Snail-mailing is something that I have been doing for years (you should see my Japanese stationary collection that I started in my teens!) and my kids have definitely adopted my love for writing letters the old fashioned way.

For us it’s also an ideal way for my kids who are schooled in Dutch and French to practice writing English in an interesting and engaging way.  You should see those early letters that they wrote to their grandmother!  Sweet and almost impossible to understand.  Luckily they’ve come a long way since then in the spelling department.

A few months ago we participated in Giova‘s Flat Project with some little handmade fabric embellished cards.  We all loved this project so much that we’ve been busy thinking of new ways to make our own letters and cards for our penpals.  Here’s our latest idea.

IMG_0828

Materials Needed:

Patterned and solid coloured thin cardboard (or even heavy paper)
Scissors
Small hole punch
Brads
shapes for tracing (cookie cutters, bowls, boxes, wooden shapes etc)IMG_0809

One day my daughter and I were rummaging through one of my (beloved) drawers full of crafty goodness and we came across a little box full of brads that I had received from my mother years ago.  We took them out and admired all the little coloured metal and cloth embellished brads and decided we needed to use them immediatly (I love it that my daughter enjoys these things as much as I do).
IMG_0817

So seeing as we had a long list of penpals to write we decided to make little books in various shapes using our favourite patterned and solid coloured papers.  We searched the house for any possible object that we could trace  for interesting shapes (cookie cutters worked the best) and my daughter  hand drew a few shapes that she had in mind as well (unfortunately we don’t have a hot air balloon cookie cutter!).

IMG_0823We made books with anywhere from 3 pages to 8 pages and either alternated with solid and patterned paper or just did a patterned cover with all solid pages.

This is a great and simple paper project to do with kids of just about any age and ability.  My kids (who are 11,11,9 years old) are experimenting with more and more complicated shapes now as well  (airplanes, windmills, various pieces of clothing and maybe even a James Bond gun).

One daughter decided to start a back-and-forth letter with one of her pen-pals using one of the books.  She wrote her letter on the first page and her pen-pal will respond on the second and send it back.  She has dreams of this little book going back and forth over the ocean for years to come.  That’s my kind of dream!

IMG_0836

Happy Week-End!

Miniature Bulletin Boards

11 Mar


1-IMG_6699
The other day I had to do one of my bi-yearly trips to IKEA to pick up a lot of stuff I don’t actually need (besides tealights and napkins of course).  While there I came across 3-packs of round cork board heat-pads for the kitchen.  As soon as I saw them I knew I had to make miniature fabric covered bulletin boards for my daughter’s room.   They are turning 11 in a few weeks and I’m planning a surprise bedroom make-over and thought this would be perfect to decorate their walls with something useful.

So as soon as I got home I plugged in my hot glue gun (I’m so scared of that thing) and started cutting out circles in various fabrics.  I cut the circles out slightly larger than the heat-pads in order to be able to fold them over the back edge and attach with glue.  And yes, it is very dangerous for burning your fingertips.  I’m pretty sure I don’t have any fingerprints left.

1-IMG_6870In the end I made six boards using different materials.  When I have painted the girl’s room I will arrange them all above their desks for them to pin up various photos, letters and keepsakes (please no boyfriend photos for a while though!).  For the photos above I attached a few to the art corner cupboard in our living room.  I think I’ll be making many more of these in the coming weeks.

1-IMG_6860Now I just have to figure out the best way to hang them up.  For the cupboard I used 2 sided adhesive pads found in the local fai-da-te (DIY shop).  But for attaching them to walls I’ll need something a little sturdier.  And advice out there?

Fabric Scrap Christmas Balls

7 Dec

This year I haven’t had so much time to make lots of new Christmas decorations but I have made some of these little fabric-scrap Christmas balls for our tree (I also sold some at the Swedish Christmas Market).  They are super easy to do and a perfect holiday craft for kids.  And they’re beautiful!  Mine might not be in the traditional Christmas colours but they do brighten up any tree or room.  And what a great way to use up all those fabric scraps you’ve been saving for years (or is that just me who does that?).

1-IMG_4723

First of all you need to get your hands on some Styrofoam balls (of any size).  Take a long wooden skewer and gently make a hole that goes all the way through the ball from the top to the bottom.  It might take a few stabs to get it through.

Now take a piece of ribbon and gently push it through the hole with the help of the wooden skewer so that it comes out the other end.  Tie a knot so that it doesn’t slip back through the hole (I also added some wooden beads on both sides of the ball).

1-IMG_4096

Combine white glue in a bowl with some water (it should be quite liquid-y) and grab a small paintbrush.

1-IMG_4099

Go through your material scraps and pick out a selection of your favorite materials.  Cut them into small pieces of different shapes.

1-IMG_4103

Now you just have to glue the tiny fabric scraps on the ball.  I brush a bit of the watered down glue directly on the ball then as well on top of the material.  You can overlap the scraps so that no white shows from the ball.  Be a bit careful not to get too much glue on the ribbon (or else it will turn stiff).  Let hang to dry overnight.

1-IMG_4709

We’ve made over a dozen so far and they look really lovely on our tree.

1-IMG_4756

Woodwork

28 Aug

One day last week my little guy Nico approached me and asked if we could do some wood work.  Always game to crack out my handy jigsaw I jumped at the chance.

We found some old pieces of wood from a previous project and Nico decided he wanted to draw a simple shape on the board to cut out with the saw.  He opted for a fish.

We put on our protective gloves and goggles and started sawing away.  It’s possible we even got a little carried away and sawed right into our outdoor wooden table (oops).  Oh and due to some reckless sawing the fish became more of an eye (that fish tail kept getting in the way anyway).

After he had his desired shape (sort of) he decided to paint it.  We got out some thick masking tape so that the lines would be well defined and got busy painting the different rings of colour.  Due to the 40 degree heat it took less than a minute for each colour to dry so we could continue with the painting without having to wait around too much.

We loved ripping off the masking tape to find beautiful crisp clear lines on our wood.  We continued the project off and on over the following days.  The sisters decided to get involved as well so we have a beautiful collection of painted wooden pieces at the moment.

I loved watching the thought process that went into the colour combinations and their concentration while painting.


After they had finished painting their lines they sprayed their wooden pieces with special varnish. That way if we leave them hanging outside the paint will be more protected against harsh weather. 

Nico’s tail-less fish.  Or eye.  Or whatever he wants it to be.

Origami shirt and tie

8 May

Being Canadian with a Belgian husband and living in Italy has made it so that I never know when Mother’s or Father’s Day is. I know that it is in different months and on different days for each of the countries and I’ve pretty much mentally blocked all those dates from my mind. I had a feeling father’s Day was coming up so I spent hours with the kids making these origami dress shirt garlands. Then my son proudly announced that he was making me a Mother’s Day gift at school which must mean Father’s Day isn’t for a while (but we’re prepared and ready well in advance!).

These origami garlands are so sweet and my kids were the ones who actually folded the shirts (even my little guy). Origami has become very popular in our home and I’m so glad I brought back that suitcase FULL of origami paper from Japan (despite comments such as “are you sure we need 30 packages of origami paper?”).I sewed the little shirts together before glueing on the ties and bow ties. You can make these shirts any size you want. My kids have made tiny tiny versions and almost life size versions. When we’re in restaurants they even fold the cloth napkins into these little shirts. It takes under a minute to fold one so you can make loads in a short amount of time.

The kids can hang them up on a doorframe or to put them into an envelope to open on Father’s Day (whenever that may be). You can leave them loose or sew them together like I did. Last year my kids included a pocket and put in really nice messages and poems.

Here’s how to do it yourself! There is one step that will make you want to crumple up the paper, run out of the room and never try origami again but please believe me that once you ‘get” it everything will run smoothly. Hopefully my instructions will help you a little (original pattern idea comes from Martha Stewart Living June 2004). Continue to read for the step-by-step…

Continue reading

Felting with kids

30 Apr

Last week-end some friends and I organised a felting morning for all of our children.  We’ve done various felting workshops in the past with our kids and they’ve always really enjoyed it.  They’ve tried needle felting (a few painful stabs were felt) and the hot water with soap method (the room was SOAKED).  Either way the kids loved doing it and always finish feeling very proud of their work.

This time the kids were asked beforehand to make a relatively simple drawing of something they love or find beautiful.

They then had to cut out pieces of different coloured felt to re-create the drawing.  We put the drawing on the table with bubble wrap over top so it was easy to see.  They then placed all the pieces of felt on top of their design.

Then they placed a piece of cream coloured felt on top of their “felted drawing” and slowly poured hot soapy water over top.  They gently patted it with their fingers to start the actual felting process.Slowly the kids can start to see their designs coming through.  The fun part…patting, rubbing, rolling and throwing the felt around.Checking to see if it’s the desired size (the more you work the felt the smaller it gets).

A Japanese inspired temple gate and a lighthouse of her dreams.

A sunny sunflower and a winged princess (5 year old artist).A cherry blossom branch and a clown with umbrella.

縫う

17 Mar

I seem to be passing a lot of time in front of the sewing machine lately.  I go for ages without sewing a thing then suddenly I’ll have a month where I pass hours daily in my little sewing room.  Bits of thread are to be found all over the house, stuck to my clothes and in my hair.

Here’s another recent sewing project made in our sewing class.  Our zipper skills are slowly getting better.  Slowly being the key word here.  They are both essentially the same bag but we lined the second one.  Which was not an easy task.  There seems to be a lot of “sewing logic” that I’m still lacking. 

As much as I love that yellow material I’m officially sick of seeing it.  I’ve been sewing things with it for months.  So I guess that means it’s time to go to a beautiful Japanese material shop to buy some new fabrics. (The Japanese characters in the post title mean sew…I hope)

San Valentino

14 Feb

I’m wishing everyone out there a wonderful day full of love and happiness.  Not just because it’s Valentine’s Day though.  I think all of our days should be full of love and happiness.  

Here are the treats (not sugar free I’m afraid) that the kids are taking into their classmates and teachers.

%d bloggers like this: