Tag Archives: sew

Bess Top

7 May

IMG_7462
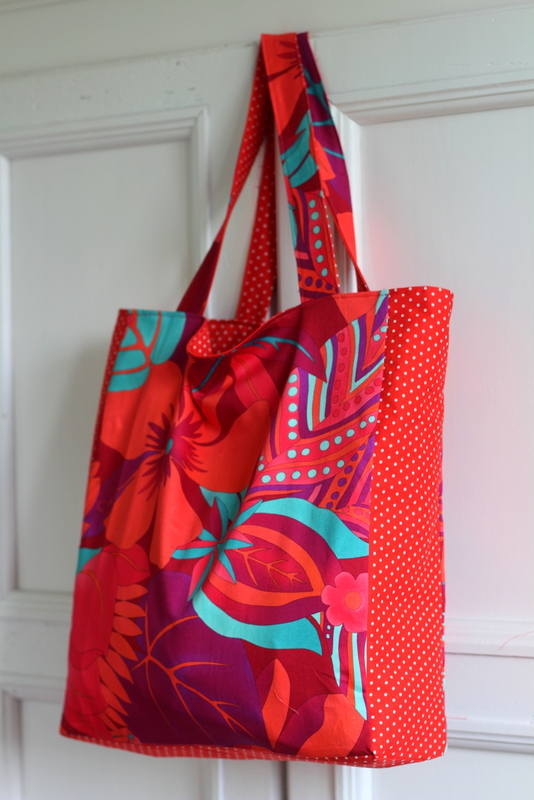
A few months ago I wrote all about the 241 Tote purse pattern that I bought online, printed off at home and sewed up.  I loved how easy and convenient it was and have decided that it’s the perfect solution for someone like me who lives in rural Italy where it’s almost impossible to find any decent sewing patterns.

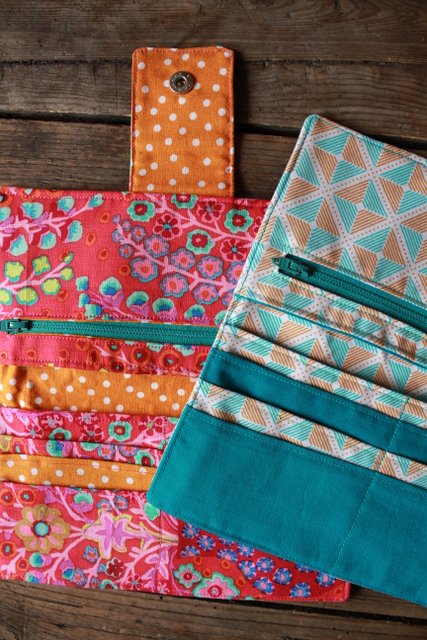
And from what I’ve seen online lately PDF sewing patterns are really gaining popularity amongst the online sewing crowd all over the world.  Just this week I saw that Jenny from The Southern Institute launched the Sew Fab Pattern Sale which is a bundle of 19 (+1 bonus) PDF patterns for $29.95.  For a girl who in the past paid upwards of $15-$20 for one pattern I find that a pretty amazing price.  IMG_7464

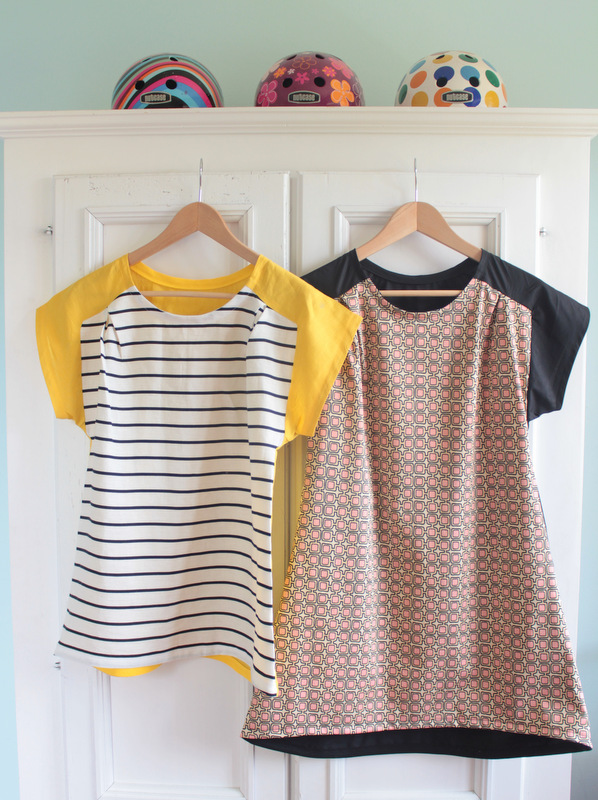
So after my success with the 241 Tote I decided to try my hand at another online pattern.  And seeing as I’ve been a Sew-Fan of Imagine Gnats for a long time I ordered her beautiful Bess Top pattern (which is all over Pinterest!).

I love the style of the top and the versatility of the pattern (3 different lengths and sizes 2-20 included).  It’s flattering on just about any body type as well.  Believe me I know, I’ve made all my friends try it on.  

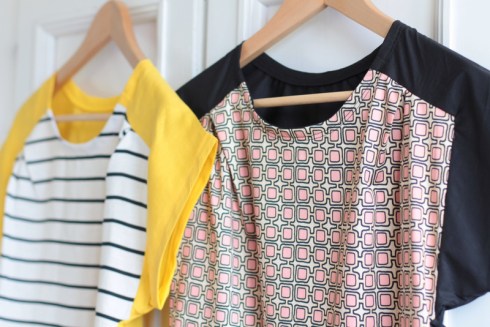
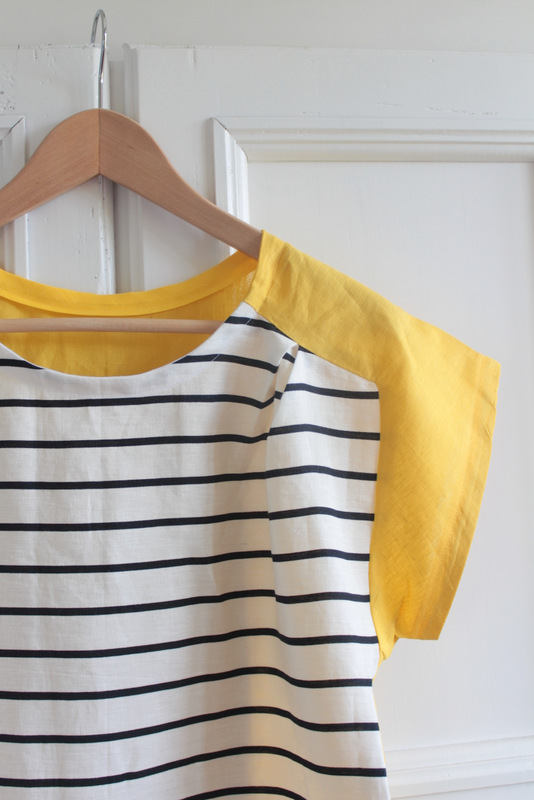
As you can see above I made one blouse/shirt length and the other a tunic length.  I also really love the subtle high-low hem.IMG_7448I used 2 Max Mara linens for the shorter version.  The linen has a lovely drape and will be perfect for our hot Italian summers.  I find that little pleat at the shoulder just the perfect touch as well.

IMG_7431 For the longer tunic version I used a really lovely patterned cotton (again Max Mara) with a solid black for the shoulder/back.  Turned out very elegant and will be perfect with black leggings in the winter.

The pattern calls for jersey knit strips to finish all the edgings.  Unfortunately I don’t have any jersey in the house so I used a thin bias instead and it seems to have worked out just fine.  

IMG_7434

Can’t wait to make up some more Bess Tops in all sorts of fabric and colour combinations this summer.  Now to convince Rachel to draft up a few kid’s sizes… 

**Get 10% off everything in the Imagine Gnats Shop (including the Bess Top and many other lovely patterns for women and kids) with the discount code Jillian10 until Monday May 12th.

Advertisement

241 Tote

21 Jan

A few months ago I posted about how much I loved Buzzmills version of the 241 Tote. Immediately after seeing her version of the purse I clicked over to Noodlehead and purchased the pattern.

I love the fact you can buy pdf versions of so many great sewing patterns on-line nowadays. Living in the Italian countryside has made it very difficult to get my hands on certain patterns for years so the fact that I can easily buy them online and print them out directly at home is just perfect.  Plus, the prices on most pdf patterns are much lower than buying one in a sewing or pattern shop.  The 241 Tote pattern costs $8 (approx. 6euro).
IMG_3925 The 241 Tote is a simple and straightforward pattern to follow. The pattern comes with several different features to choose from (pockets or zippers on the outside).  As the pattern is quite adaptable I opted to only include the pockets on the outside although it would be possible to have them on the inside as well.

IMG_3926I bought this lovely linen in Japan a few years ago (I think it’s Echino but am not certain) and have been patiently saving it for the perfect sewing project. Since it’s quite a bold pattern I paired it with a few solids and I love the result.  Come to think of it I really need to get back to Japan to find some new fabrics.
IMG_3932I even made a very bright version for my daughters.  This time I used a heavy (almost canvas) cotton from IKEA and some light cotton Petit Pan fabric (which I enforced with interfacing).  IMG_3931Definitely not a look for everyone but my daughters are in love with it!

 I’ll definitely be making a few more of these purses in the near future.

SuperCut Fabric Shop

9 Jan

As some of you may know, I love pretty fabrics of every kind.  I don’t drink.  I don’t do drugs.  I don’t smoke.  But I do love to buy (lots of) beautiful fabrics.  I have a gorgeous collection of materials that I have purchased all over the world and I use them on a daily basis.  I may use a new fabric right away or I may even save it for years before using it.  I often sit in my sewing room and look through my beloved materials and imagine what beautiful projects I could make with them (that’s what happens when you don’t have a TV).

Since living in Italy (for more than a decade) I’ve bought almost all of my fabrics outside of Italy.  I really searched for shops here that had beautiful fabrics but I just couldn’t find any that really appealed to my taste.  So after years of buying primarily in Canada (every time I return with a suitcase full), in Belgium (here is my favourite shop) and from Dutch online shops you can imagine how excited I was when I found out about the Italian online fabric shop SuperCut that is based out of the city of Bergamo.  I’ve always been a huge fan of supporting local small businesses so this was a great find for me.

The very sweet French owner Marine has excellent taste in fabrics and after going through her shop I realised that she picks out pretty much every fabric brand and design that I myself am so fond of.  It’s really a match made in heaven!  You can find fabrics from Liberty, Petit Pan, Echino, Kokka, Kitsch Kitchen and many more.  Marine stocks cottons, canvases, linens and even has a great selection of oilcloth and notions as well.  And SuperCut ships all over Europe.

Yesterday I ordered my first SuperCut fabrics and they actually arrived in my mailbox this afternoon.  I was like a kid at Christmas as I was opening the beautifully wrapped package.  And everything I ordered was perfect.  You can’t imagine how long I’ve been looking for fluo pink and yellow bias!

My lovely purchases

My lovely purchases

And as an added bonus many of the SuperCut fabrics are currently on sale (even the Echino and Kokka fabrics!).   So pop on over and take a look!

Summertime Surprise Activity Garland

17 Jul

IMG_0067After a lot of motivation from my three enthusiastic kids I finally finished sewing up their summertime surprise activity garland yesterday.  They are so excited to do this again this year.  I changed up a few activities from last year and kept a few that were big hits (with a slightly different twist to keep it interesting).  This garland is perfect for those moments that the kids are just too tired/hot/bored to come up with something on their own.  And surprisingly enough, it’s a great way to get your kids working together.  Last year after opening the “architectural challenge” I watched my three kids construct a fairytale village in the lawn with wooden skewers, toothpicks and leaves for over three hours.  Their concentration and team work was amazing to see.IMG_0038

First of all I rummaged through my fabric scraps and sewed up some different sized pouches in which to put the activity items (measure all items and sew accordingly).  I just placed two identically sized pieces of material together (bad sides facing) and sewed three sides.  Nothing fancy!  After inserting the activity cards and items I simply sewed them all shut along a long piece of folded bias tape (you could also use ribbon or a long piece of fabric).

Here are the activities in this year’s garland:

The Photo Challenge: Last year the photo challenge was such a hit that I had to include another one this year.  They spent ages coming up with the perfect compositions for their photos last year and the little book we made with them is often hauled out and admired.  I just tucked a little card in the fabric pocket that instructs them to take photos that represent a list of 10 words (happy, summer, dance, self portrait and more that I can’t for the life of me remember now).

The Architectural Challenge: Another favourite from last year.  I included a few packages of long wooden kitchen skewers and toothpicks and some of that sticky gum-like stuff you use to hang photos on the wall (what is that called?!).  On the card I gave them instructions to construct a circus tent and come up with name and sign as well.  They use the lawn as their base because it’s easy to stick the skewers in for a stable construction.  I’ll also give them some small pieces of fabric to decorate.

Whittle Challenge:  This is a new one this year.  On the card I wrote asking them to look up the word whittle in the dictionary (because I’m pretty sure my multi-lingual kids have never heard that word).  Once they’ve figured it out they have to whittle (with small knife provided by me) shapes out of some small bars of soap (see there is a good reason to take those little hotel soaps home with you!).  I’ve included simple shapes to whittle such as heart, star, and flower.  I’ll let you know how it works out and if there are any major injuries.

Comic Book Challenge:  My kids are HUGE comic book fans (it’s a Dutch thing I guess).  So I made a tiny book with blank pages.  I divided each page into four boxes to accommadate their drawings and story.  They have to come up with a story with a circus theme and make their own comic book.  The ultimate work-together project.  Again, I’ll let you know if there are any injuries.

Cooking Challenge: My kids are really into cooking all of a sudden.  And since I really want to encourage and motivate them in the kitchen as much as I can I thought a cooking challenge would be perfect. So for this challenge I included a card which sends them on a search for a particular cookbook on our shelf and to a particular page.  They then have to prepare that recipe.  This year it’s a recipe for homemade pigs-in-blankets from the children’s cookbook Look and Cook by Tina Davis.

IMG_0080On top of it being fun for kids this garland is also really pretty to hang up!  When the kids are ready to open one of the pouches just cut open along the bottom (which makes it hardly noticeable that it has been opened).  You can then keep the garland for decoration or for re-filling with activities next summer.

We’ll be kicking off our garland activities in the coming days.  I’ll keep you posted on how they were all received by the little ones!

Slacker Update

15 May

IMG_8286-001

For the first time in years I actually don’t feel like a serious slacker.  After writing about being the Queen of Unfinished Projects a few weeks ago I went into sewing overdrive and actually finished most of my half-done and half-sewn projects that have been lingering and taunting me in my sewing room for the last months (years).  I hemmed, I mended, I button-holed, I zippered and I even hand sewed until the wee hours of the morning.  I guess writing it all down and addressing the fact that I needed to get my act in gear helped me to realise it was time.  Time to have a clean sewing slate and move on to new and fresh projects without the niggling feeling of having all those almost-finished purses, bags, dresses, shorts and wallets that I would eventually have to deal with.

These dresses were supposed to be ready for my twin daughter’s 11th birthday.  Obviously that didn’t happen as it was on March 28th (it was too cold and rainy in March anyway to be able to wear dresses like this).  As I mentioned last time the pattern is one of the basic dress models from the book Stof Voor Durf-Het-Selvers (only available in Dutch).  The book has some great patterns  for children’s dresses, skirts, tops and accessories and gorgeous photos using the most lovely fabrics.  I used contrast colour zippers on the dresses to give them a little something special and actually ended up making one dress with a side zipper instead of back zipper by mistake.  Don’t ask.  These will be perfect for special occasions this summer while we’re in Umbria and Canada.

IMG_8298I did a double lined hem on these seersucker shorts for my son and actually sewed on all 4 buttons needed (miracle).  Unfortunately they’re still too big so he’ll most likely only get to wear them next year.  Until then I’ll display them for all to see and admire (poor guests).  These were some seriously complicated and time consuming shorts to make and I’m pretty sure I could buy similar (even nicer?) ones in H&M for a fraction of the cost to make them.  But I guess I shouldn’t think about that…

IMG_8374I also finished this simple summer sleeveless shirt.  Very quick to sew up and comfortable to wear (even if I did make mine 2 sizes too big).  Fabric is from Max Mara and the pattern is Simplicity New Look 6871.

IMG_8356And today in my sewing group I managed to finish up this boxy shopper bag with zipper closure.  Just what I needed in my life…another bag.  I think I could open up a shop with all my hand made bags and wallets that I’ve been stockpiling over the last few years. Stay tuned for details of my Etsy Shop in the near (or far?) future.

I’m still finishing off the last of my projects and I’m feeling great about it.  Now to get busy with my new projects that I’ll most likely have to finish in a few years time….

Queen of Unfinished Projects

30 Apr

This morning I was tidying up my sewing room (seriously one of my favorite things to do) and I came across quite a few projects that I enthusiastically started but never actually got around to finishing.  Some of them I started  in the past few weeks and a few are from the last few… years.  The shame.  Last month I actually found a half sewn pair of pajama pants that I started when I was in university in the 90’s.  So now I’m mentally gearing myself up to finish up these projects  once and for all and get started on some new ones.  Please tell me I’m not alone with this problem.  Do any of you out there also have some unfinished projects taking up space and taunting you whenever you see them?
20130430-143659.jpg

Here are some Seersucker shorts that I made for my son.  The pattern was one of the most difficult I’ve ever done (thank goodness for friends with such great knowledge of pattern language!).  There are fancy pockets, belt loops, a zipper and way too many buttons and button holes.  I learned a lot of great sewing techniques from these shorts.  But I will never make them again in my life.  Now I just have to motivate myself to hem them.  Hemming is always my weak point.

20130430-143759.jpgOne day I holed myself up in my sewing room (about 8 months ago) and sewed up all of these fabric leaves and circles.  I never really had a solid idea of what I was going to do with them but I was confident  it would come to me sometime.  It still hasn’t come to me.  Any ideas for what to do with these out there?

20130430-143906.jpgMy mother-in-law and I started these dresses above during her time here at Easter.  The pattern is from my newest sewing book Stof Voor Durf-Het-Selvers by Lies Bottermans and Griet De Smedt (as far as I know it’s only available in Dutch).  They are absolutely lovely and so close to being finished.  One needs a zipper installed (not my favorite job) and they both need to be hemmed.  In any case, I’ll make sure they’re done by summertime.  Maybe my Mother-in-law should return to finish them with me (hint hint).

20130430-144044.jpgA little summer sleeveless top made with Max Mara fabric.  I’ll be finishing it up with my sewing group this Friday.  So at least I can check that one off my list right away.  It’s a start!

20130430-144350.jpgThis is the project that I started about 18 months ago.  I made about 8 of these purses for Christmas gifts and I guess by the time I started this one I just couldn’t bring myself to finish yet another one.  It’s made with black linen and a soft  thick cotton.  I think I’m finally ready to finish it up and make a few more.  If I can remember the pattern of course.

So wish me luck on finishing all of these projects and making room (mentally and physically) for some new projects that I’ve had simmering in my head for a while.  And if a few of you harassed me every now and then to see the finished products  I’d really appreciate it.

Tutorial: Small Fabric Basket

19 Mar

{Here’s  little simple sewing project from the Jillian In Italy archives.  I think this would be a great project to do for Easter for the kids or even with the kids.  I can just imagine a garden full of these sweet little baskets filled with Easter eggs and candy.}

Here is a very basic tutorial that a good friend of mine designed for a very sweet little fabric basket.  Very quick and gratifying.  I used oilcloth for the outside and a cotton for the inside but it would be possible to use only cotton as well (or even nicer would be linen).  If using cottons or linens I would recommend using interfacing to make it stiff enough to stand up on it’s own.  The paper clips are used to avoid getting little pin holes in the plasticized material or oilcloth. Please let me know if I wasn’t clear on any of my instructions (I know the corner part is a bit hard to see in the photo).

Read on to get full tutorial. Continue reading

Cucito

5 Mar

For some reason I’ve been really busy at my sewing machine lately.  Every day I find myself holed up in my sewing room with little bits of  thread hanging from my hair, on my clothes and pretty much all over every surface in the entire house.

Once I start on a project I seem to lose my sense of time and what else needs to get done around here.  In other words, we’ve been living off take-out pizza and canned tuna  for a few days now and the house is looking a little worse for wear (not yet squalor state yet though!).

Here are a few finished items from the last week:

1-IMG_6828

I’m trying to bring the funky back to smocks for the little ones.  Oh yeah, it was never there.  But seriously, I’m going to change the way the world sees smocks.  I have big plans.

Unfortunately I had some issues with this MaxMara fabric running (see the little white lines coming from the bias?) due to the stretch in the fabric.  Any tips out there on how to avoid this?  Thinner needle perhaps?

1-IMG_6824

I’m in the process of taking a creative map making course over on Skillshare and I decided to step away from the computer and do something handmade.  I printed off a map of Europe on some cotton muslin and embroidered our first trips as a family.  Now I still have to figure out whether I make it into a pillow, or something to hang on the wall etc.  Any ideas?

1-IMG_6816Last week I finished making up a few wallets in our sewing group.  It was always one of those projects that seemed too advanced and complicated but in the end it was actually quite do-able.  There are a lot of pieces involved and three weights of interfacing but I didn’t have a breakdown…not even once.

1-IMG_6820

Look!  A zipper pouch, credit card pockets, and a snap closure! What more could you want in a sewing project?  Pattern from 101 Fabric-by-Fabric Ways To Sew a Metre by Rebecca Yaker.

1-IMG_6814And last but not least, today I whipped up this little bag  (similar to this one from a few weeks ago).  This beautiful cotton fabric is Point of Sail by Michael Miller.

Echino Purse

15 Feb

The other day some good friends and I got together for our weekly sewing morning  and we decided to try out a pattern from a new sewing book I received my mother called 101 Great Ways to Sew a Metre by Rebecca Yaker and Patricia Hoskins.  The book is full of patterns for various bags, purses, clothing, toys and other household items and no project asks for more than a metre of fabric.  The patterns are all really well explained with clear instructions.  I have to admit that the spats (cowboy boot covers) found on page 147 will not be made by me though.

1-IMG_5767

We decided to sew the Scrunchie Bag (page166) because it’s a big and roomy casual purse that we thought would come in quite handy.  I decided to use a gorgeous fabric with vintage typewriters on it by the Japanese brand Kokka (Melody Miller’s Ruby Star Shining).  For the inside of the bag I used a spotted linen that I purchased in Japan last year.  The two fabrics compliment each other perfectly.

1-IMG_5770

We loved the fact that there were rings for the strap and that the top was elasticized.  Both new sewing techniques for us.  We cut and finished sewing the bag in less than three hours.  My kind of sewing project.

1-IMG_5780-001

I’m quite in love with my new typewrite purse.

(here’s my last sewing project using Echino fabric)

Valentine’s Heart Necklace

21 Jan

1-IMG_5342

Usually my 10 year old daughters take in a little Valentine’s gift or treat for all the kids in their class (last year’s treats here).  But this year things  have changed a little.  It seems as though the thought of giving the boys anything to do with love or fondness is something that makes their little cheeks turn pink. They say the boys are silly, not interesting, noisy and smelly.  In other words, they’re starting to NOTICE them.  Oh gosh.

So together with my daughters we came up with a these little puffed heart necklaces that they can give to all the girls in their class.  It’s a quick and simple project that my daughters helped with and the result is absolutely adorable.  I can just imagine their little group of girlfriends walking around school on Valentine’s Day with these little coloured fabric hearts hanging around their necks.

1-IMG_5568

I cut the cotton batting heart slightly smaller than the cotton hearts so that there was no risk of it poking out after being stitched.

1-IMG_5567

Now you just have to layer all the hearts and string.  Put the first cotton heart right side down then place the cotton batting heart on top.  Next place the string across the middle (or slightly higher up) and then the last cotton heart on top (good side facing up).

1-IMG_5589-001

Now you just have to simply stitch around the outside of the heart.  For some I used the  zigzag stitch instead and it also gave a nice effect.

1-IMG_5297We then took some heavy card stock to make little Valentine’s Cards in which to give the necklaces.  We punched two little holes near the top to pass the string through and used Washi tap to fasten the rolled string on the other side.  You can add little messages and notes inside the card as well.

1-IMG_5347-001

%d bloggers like this: