Archive | Creative RSS feed for this section

Moroccan Pigment Painting

14 Mar

1-IMG_6298As some of you may know last month we spent a week visiting the beautiful country of Morocco (see my travel column about our time in the Atlas Mountains here).  While in Marrakesh we spent quite a bit of time wandering through the maze of souks (markets) and admiring all the various stalls and shops selling leather purses and slippers, ceramic bowls, carpets, jewelry, antiques and pretty much anything else you could ever desire.

One of our favorite shops to visit were the spice shops.  They were full of bottles upon bottles filled with every kind of spice and herb you could ever imagine.  The aroma these shops give off can be smelled from far away and is almost intoxicating while you’re actually inside.

At the shop above we bought little plastic sacks filled with freshly ground cumin (did you know in Morocco they put salt and cumin on the dining table instead of salt and pepper?), Moroccan 35 spice, the most intense yellow tumeric I’ve ever seen, Moroccan curry and the most amazing and pungent smelling cinnamon ever.  Since returning home I’ve tried all my spices and they are absolutely amazing.  They add so much  flavour to any dish.

1-IMG_6303

But the most intriguing items we bought in one of these little spice shops were the coloured powdered pigments.  At first we had no idea what all the jars full of coloured water were but the kind shop owner Mohammed explained that these are pigments used for painting and dying clothing.  As a lover of bright colours and anything creative I decided to buy some to experiment with back home on a rainy day.  As luck would have it, the week after we arrived home we had a stay-at-home day and these pigments were the perfect activity to stay warm in front of the fireplace.

Mohammed told us to mix small amounts of the pigment powders with lemon juice.  I think the kids had just as much fun doing this than the actual painting.  The colours turned out so vibrant and reminiscent of the colours we saw everywhere in Morocco.

1-IMG_6781

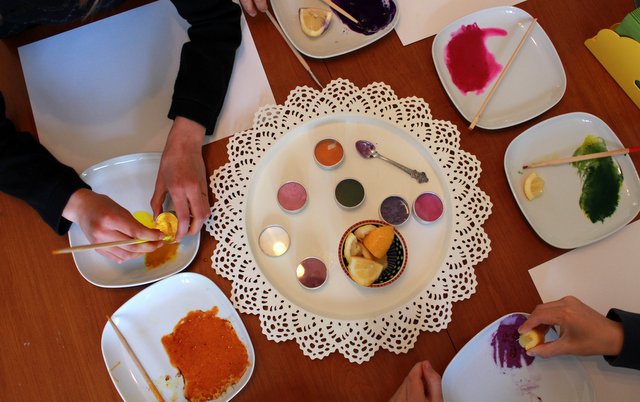
The paint has quite a different texture to normal paints and actually dries with a beautiful smooth and almost shiny finish.

1-IMG_6788

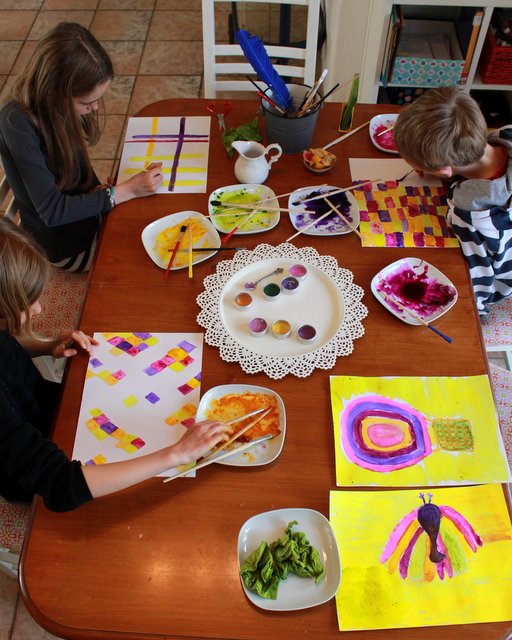
It’s not often that these big kids of mine have time to sit down and paint for a morning like we did so often in the past.  I have to admit that I loved every single minute of it.

Miniature Bulletin Boards

11 Mar


1-IMG_6699
The other day I had to do one of my bi-yearly trips to IKEA to pick up a lot of stuff I don’t actually need (besides tealights and napkins of course).  While there I came across 3-packs of round cork board heat-pads for the kitchen.  As soon as I saw them I knew I had to make miniature fabric covered bulletin boards for my daughter’s room.   They are turning 11 in a few weeks and I’m planning a surprise bedroom make-over and thought this would be perfect to decorate their walls with something useful.

So as soon as I got home I plugged in my hot glue gun (I’m so scared of that thing) and started cutting out circles in various fabrics.  I cut the circles out slightly larger than the heat-pads in order to be able to fold them over the back edge and attach with glue.  And yes, it is very dangerous for burning your fingertips.  I’m pretty sure I don’t have any fingerprints left.

1-IMG_6870In the end I made six boards using different materials.  When I have painted the girl’s room I will arrange them all above their desks for them to pin up various photos, letters and keepsakes (please no boyfriend photos for a while though!).  For the photos above I attached a few to the art corner cupboard in our living room.  I think I’ll be making many more of these in the coming weeks.

1-IMG_6860Now I just have to figure out the best way to hang them up.  For the cupboard I used 2 sided adhesive pads found in the local fai-da-te (DIY shop).  But for attaching them to walls I’ll need something a little sturdier.  And advice out there?

Cucito

5 Mar

For some reason I’ve been really busy at my sewing machine lately.  Every day I find myself holed up in my sewing room with little bits of  thread hanging from my hair, on my clothes and pretty much all over every surface in the entire house.

Once I start on a project I seem to lose my sense of time and what else needs to get done around here.  In other words, we’ve been living off take-out pizza and canned tuna  for a few days now and the house is looking a little worse for wear (not yet squalor state yet though!).

Here are a few finished items from the last week:

1-IMG_6828

I’m trying to bring the funky back to smocks for the little ones.  Oh yeah, it was never there.  But seriously, I’m going to change the way the world sees smocks.  I have big plans.

Unfortunately I had some issues with this MaxMara fabric running (see the little white lines coming from the bias?) due to the stretch in the fabric.  Any tips out there on how to avoid this?  Thinner needle perhaps?

1-IMG_6824

I’m in the process of taking a creative map making course over on Skillshare and I decided to step away from the computer and do something handmade.  I printed off a map of Europe on some cotton muslin and embroidered our first trips as a family.  Now I still have to figure out whether I make it into a pillow, or something to hang on the wall etc.  Any ideas?

1-IMG_6816Last week I finished making up a few wallets in our sewing group.  It was always one of those projects that seemed too advanced and complicated but in the end it was actually quite do-able.  There are a lot of pieces involved and three weights of interfacing but I didn’t have a breakdown…not even once.

1-IMG_6820

Look!  A zipper pouch, credit card pockets, and a snap closure! What more could you want in a sewing project?  Pattern from 101 Fabric-by-Fabric Ways To Sew a Metre by Rebecca Yaker.

1-IMG_6814And last but not least, today I whipped up this little bag  (similar to this one from a few weeks ago).  This beautiful cotton fabric is Point of Sail by Michael Miller.

Friday

22 Feb

It’s Friday folks.  And I couldn’t be happier about it.   Getting into the early morning school routine is always so difficult after a vacation.  And the snowy weather the last few days really made me want to cocoon at home with the kids in front of the fire.

1-IMG_6616

During the snowstorm yesterday I made these Oatmeal Raspberry Squares (raspberry variation of these from The Pioneer Woman).  They are just so amazingly delicious.  And I realize I say that about every recipe I post about on this blog but I just have a talent for finding and trying out recipes that are delectable. Might help that the majority involve large quantities of brown sugar and butter.

These squares are so quick and simple to whip up.  In less than 10 minutes prep time they were in the oven baking.  And I just want to boast about the fact that I didn’t even try one tiny little piece of these bars when I made them yesterday.  My no-sugar-during-the-week rule is still on (5 months) and even though it took every ounce of self-control my body had to offer I made it until today to have a taste (past noon on Friday is considered week-end to me).  Yesterday evening I watched my family devour them and ooh and aah about how yummy they were and I sat there, with my jaw tightly clenched, and resisted the urge to shove my face in the pan and polish off the entire thing.  Round of applause please.

1-IMG_5756

Another little piece of news is that my Embroidery With Kids craft is on Disney’s Spoonful blog at the moment.  Exciting stuff.

Indian Butter Chicken Meatballs

I also wanted to share the link for this recipe for Indian Butter Chicken Meatballs.  I made it for the family this week and and it was a huge hit,  So much flavour and simple to make up beforehand.  My kids all said it was one of their favorite meals (ALL of them…it’s a miracle).

Besides going to an Irish Dance Show on Saturday evening, we have a very relaxing and low-key week-end planned.  Lots of walks in the woods, pancakes and some puppy-sitting for friends.  Hope you all have a lovely week-end!

Echino Purse

15 Feb

The other day some good friends and I got together for our weekly sewing morning  and we decided to try out a pattern from a new sewing book I received my mother called 101 Great Ways to Sew a Metre by Rebecca Yaker and Patricia Hoskins.  The book is full of patterns for various bags, purses, clothing, toys and other household items and no project asks for more than a metre of fabric.  The patterns are all really well explained with clear instructions.  I have to admit that the spats (cowboy boot covers) found on page 147 will not be made by me though.

1-IMG_5767

We decided to sew the Scrunchie Bag (page166) because it’s a big and roomy casual purse that we thought would come in quite handy.  I decided to use a gorgeous fabric with vintage typewriters on it by the Japanese brand Kokka (Melody Miller’s Ruby Star Shining).  For the inside of the bag I used a spotted linen that I purchased in Japan last year.  The two fabrics compliment each other perfectly.

1-IMG_5770

We loved the fact that there were rings for the strap and that the top was elasticized.  Both new sewing techniques for us.  We cut and finished sewing the bag in less than three hours.  My kind of sewing project.

1-IMG_5780-001

I’m quite in love with my new typewrite purse.

(here’s my last sewing project using Echino fabric)

Valentine’s Round Up

13 Feb

Here I am writing from a little riad in Marrakech, Morocco.  We arrived here today after spending the last few days in a tiny village in the Atlas mountains.  It was an amazing time which included lots of walks in the mountains, a camel trek and some of the best food we’ve ever eaten.  And to top it all off we’ve had amazing weather since we arrived.  Yes, we are all ecstatically happy at the moment.

Even if the Moroccans don’t celebrate Valentine’s Day it’s been on my mind the last few days.  I have secretly stashed some home-baked heart-shaped chocolate-dipped cookies in our suitcase so that I’ll have something special for the family on the 14th.  I’m pretty sure Valentine’s Day this year will be one we’ll remember forever.

Here’s a little round-up of some of my favourite Valentine’s Day treats and surprises that you can make your loved ones.

1-IMG_5342

These little puffy sewn heart necklaces are the sweetest way to show your favourite little girl that she’s loved.  It’s an easy project that your kids can help you with.  Check out post and tutorial here.

free-valentine-day-card-printable

I love these Valentine’s Day cards over on Classic Play.  And you can download them for free!  Check out post here.

1-IMG_5438These Brown Sugar Shortbreads are the most delicious rich cookies and are perfect for Valentine’s Day due to the little jam heart centres.  Your house will smell divine while these are baking!  Get recipe here.

DIY Edible Confetti by The Proper Pinwheel

Edible confetti!  This is one of my favorite Valentine’s Day finds this year.  Easy to make and such a fun idea for a gift for classmates (or co-workers!).  Get full details and how-to on The Proper Pinwheel.

We made these little candy bags for the twin’s classmates last year and they were a hit.  All you need are some clear plastic bags, pink and red construction paper, some colourful candy and a stapler.  Check out what we made my son’s class and the teachers here.

Valentines-Competition-La-tete-dans-les-idees

I absolutely adore this cupid’s arrow diy that is over on La Tete Dans Les Idees.

Enjoy your Valentine’s Day and make sure to tell the ones you love how much they mean to you!

Embroidery With Kids

6 Feb


The last ten days have been a little rough around this household.  A few kids caught an evil virus and were laid up with high fever for over a week.  I don’t remember the last time any of my kids were so sick.   And I had forgotten what it’s like to be house-bound for OVER A WEEK.  But we survived.  And we had some lovely moments together over the past ten days.

1-IMG_5756

At a certain point I was fed up of playing Connect Four, Phase 10 and Ingenious so I went and started rummaging through my sewing room for some ideas of something creative to do with sick kids.  I found an old box full of wooden embroidery rings, a roll of old burlap, large needles and some colourful yarn and thread.  A perfect activity for kids who don’t have the energy to get off the couch but are bored and in need of something to do with their hands.

1-IMG_5697

Using burlap to teach kids embroidery is ideal because it’s so easy to get the needle and thread/yarn through the largely woven fabric and even possible to reverse if a mistake is made.  And the contrast of the earthy textured brown material with brightly coloured thread  is absolutely lovely.  One little piece of advice would be to always zigzag the edges of the burlap beforehand to reduce fraying.

1-IMG_5743

I quickly showed the kids the basics of embroidery and then left them to create whatever pattern came to mind.  We all sat around the living room with the fire blazing and listening to classical music playing in the background.  So cozy and slightly Little House on the Prairie-ish.

1-IMG_5752

After the designs were done we made them into little miniature pillows using different coloured velvets for the back.  The kids are so proud of their creations.  Their mama as well.


Origami Obsessed

4 Feb

Every since I was a little girl I’ve been so intrigued by origami.   I’ve always loved all the beautiful shapes and papers and the fact that you can construct something so intricate from one little piece of paper.

When we were in Japan last year we visited lots of shops with the most gorgeous origami paper and ended up coming home with a suitcase full.  Since then we’ve been using it on a daily basis to fold everything from 1000 paper cranes to various origami clothing to frogs that can actually jump.  My kids have adopted my origami passion and I couldn’t be happier (and prouder).

One of my daughters received an origami book for Christmas called Genuine Origami.  The book offers 43 mathematically based origami models with some having up to 144 folds (for one piece of paper).  We have already done a few of the “basic models” from the book and they already had us sweating with all of the special technique folds.  My daughter has a goal of doing every  model in the book before the end of the year.  I think it will be a great father/daughter activity (in other words, I’m not interested in complex mathematical origami).

And since origami has obviously been on our minds lately, we’ve been seeing things related to origami everywhere.  Here are some of our favourites:

Origami Inflatable Scarf  created by Monomatopee (found here).

This origami wallpaper by Dottir and Sonur is absolutely gorgeous.  And I’m seriously thinking of ordering a few rolls for a surprise bedroom makeover for my daughter’s birthday next month.

Once I get on etsy I can’t seem to tear myself away for ages.  I came across these gorgeous pillows by Kissen Studio.  They’re made of silk and linen and come in a variety of origami designs.  I love the paper airplane one as well.

Pinned Image

These diy origami lamps with masking tape are gorgeous (found here).  A great rainy day project perhaps?

I’m in love with these origami inspired kid’s clothing from Uruguayan company Trommpo.  Trommpo specialises in clothing with geometric cuts and bold use of colour and shapes.

Paper Plane Necklace in Gold,  Japanese origami inspired gold pendant jewelry

Once again I found myself on Etsy and I discovered some gorgeous origami jewelery by Schlomit Offir.  They offer many different designs at really reasonable prices (Valentine Origami Necklace is now on sale!).

Do any of you have some favorite origami-inspired products, housewares, clothing etc?

Valentine’s Heart Necklace

21 Jan

1-IMG_5342

Usually my 10 year old daughters take in a little Valentine’s gift or treat for all the kids in their class (last year’s treats here).  But this year things  have changed a little.  It seems as though the thought of giving the boys anything to do with love or fondness is something that makes their little cheeks turn pink. They say the boys are silly, not interesting, noisy and smelly.  In other words, they’re starting to NOTICE them.  Oh gosh.

So together with my daughters we came up with a these little puffed heart necklaces that they can give to all the girls in their class.  It’s a quick and simple project that my daughters helped with and the result is absolutely adorable.  I can just imagine their little group of girlfriends walking around school on Valentine’s Day with these little coloured fabric hearts hanging around their necks.

1-IMG_5568

I cut the cotton batting heart slightly smaller than the cotton hearts so that there was no risk of it poking out after being stitched.

1-IMG_5567

Now you just have to layer all the hearts and string.  Put the first cotton heart right side down then place the cotton batting heart on top.  Next place the string across the middle (or slightly higher up) and then the last cotton heart on top (good side facing up).

1-IMG_5589-001

Now you just have to simply stitch around the outside of the heart.  For some I used the  zigzag stitch instead and it also gave a nice effect.

1-IMG_5297We then took some heavy card stock to make little Valentine’s Cards in which to give the necklaces.  We punched two little holes near the top to pass the string through and used Washi tap to fasten the rolled string on the other side.  You can add little messages and notes inside the card as well.

1-IMG_5347-001

Fabric Scrap Christmas Balls

7 Dec

This year I haven’t had so much time to make lots of new Christmas decorations but I have made some of these little fabric-scrap Christmas balls for our tree (I also sold some at the Swedish Christmas Market).  They are super easy to do and a perfect holiday craft for kids.  And they’re beautiful!  Mine might not be in the traditional Christmas colours but they do brighten up any tree or room.  And what a great way to use up all those fabric scraps you’ve been saving for years (or is that just me who does that?).

1-IMG_4723

First of all you need to get your hands on some Styrofoam balls (of any size).  Take a long wooden skewer and gently make a hole that goes all the way through the ball from the top to the bottom.  It might take a few stabs to get it through.

Now take a piece of ribbon and gently push it through the hole with the help of the wooden skewer so that it comes out the other end.  Tie a knot so that it doesn’t slip back through the hole (I also added some wooden beads on both sides of the ball).

1-IMG_4096

Combine white glue in a bowl with some water (it should be quite liquid-y) and grab a small paintbrush.

1-IMG_4099

Go through your material scraps and pick out a selection of your favorite materials.  Cut them into small pieces of different shapes.

1-IMG_4103

Now you just have to glue the tiny fabric scraps on the ball.  I brush a bit of the watered down glue directly on the ball then as well on top of the material.  You can overlap the scraps so that no white shows from the ball.  Be a bit careful not to get too much glue on the ribbon (or else it will turn stiff).  Let hang to dry overnight.

1-IMG_4709

We’ve made over a dozen so far and they look really lovely on our tree.

1-IMG_4756